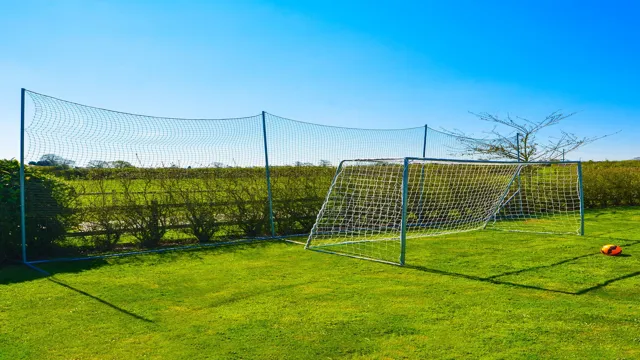
Do you love playing basketball but struggle with losing the ball frequently due to it going out of bounds? Or do you live in an area where retrieving the ball after every shot is tedious and time-consuming? You’re not alone. Many basketball enthusiasts face this problem, but there’s a solution: DIY basketball barrier nets. With a DIY basketball barrier net, you can keep the ball in play and avoid the hassle of constantly running to retrieve it.
A basketball barrier net is an easy and affordable way to bring more fun and excitement to your game. Plus, it’s a great way to challenge yourself and perfect your aim. But how can you create a DIY basketball barrier net? What materials do you need? And how do you set it up? Don’t worry, we’ve got you covered.
In this blog, we’ll share everything you need to know about creating your own basketball barrier net. From choosing the right materials to setting it up, we’ll walk you through the process step-by-step. So, if you’re ready to take your basketball game to the next level, keep reading.
Whether you’re a beginner or a pro, this DIY basketball barrier net is perfect for anyone who wants to improve their skills while having fun. Get ready to score big and impress your friends with your stunning basketball skills.
Why Choose DIY?
If you’re a basketball enthusiast, you know that having a basketball barrier net is crucial to keeping the ball from flying out of bounds and risking damage to property or injury to people. While you can always hire a professional to install one for you, opting for a DIY project can be a more cost-effective and rewarding experience. DIY basketball barrier nets are easy to put together and you can choose the exact specifications you want, such as size and material.
With a little bit of research and the right tools, you can make a net that suits your needs perfectly. Plus, the satisfaction of doing it yourself can be empowering and inspire you to take on more DIY projects in the future. So why not give it a shot and see for yourself how easy and fulfilling a DIY basketball barrier net can be?
Cost Savings
When it comes to home improvement projects, opting for the DIY route can save you a significant amount of money compared to hiring professionals. Why choose DIY? Well, for starters, you have full control over the project and can customize it to your liking. Additionally, you won’t have to pay for labor costs, which can eat up a significant portion of your budget.
Another factor to consider is that many home improvement stores offer free workshops and classes to help you learn how to tackle projects on your own. With some research and practice, you can become a DIY pro and save even more money in the long run. However, it’s important to remember that not all projects can or should be tackled by amateurs.
Safety should always be a top priority, and some projects may require special equipment or expertise. Before starting any project, make sure to do your research and consult with professionals if needed. By choosing DIY, you can save money while also gaining a sense of pride and accomplishment from completing projects on your own.
Customization
Customization Why choose DIY customization? Well, for starters, it allows you to truly make a product your own. Instead of settling for a pre-made item that may not fit your exact needs or style, you have the ability to create something unique and perfect for you. Plus, there’s a sense of pride that comes with DIY-ing something yourself.
It’s a way to showcase your creativity and skills, and a great way to personalize gifts for loved ones. Not to mention, DIY customization can often save you money in the long run, as you’re not paying for the labor or mark-up of a pre-made product. So next time you’re considering purchasing something that just isn’t quite right, consider taking the DIY route and creating exactly what you want.
Personal Satisfaction
The reason why DIY projects can bring immense personal satisfaction is that they allow us to tap into our creative side and bring our unique ideas to life. When we create something with our own two hands, we feel a sense of accomplishment that cannot be replicated through buying something ready-made. There’s also a level of pride in showing off our handiwork to family and friends, knowing that we put in the effort and time to bring our vision to reality.
Another perk of DIY is that it allows us to customize our projects to our specific wants and needs. Instead of settling for something that is not quite what we’re looking for, we can tailor our creations to match our exact specifications. Plus, the process of DIYing can be therapeutic as we focus our energy on a task and become immersed in the flow of creativity.
Ultimately, DIY projects provide a satisfying way to express ourselves and create something beautiful in the world.
Materials Needed
If you’re looking to make your own basketball barrier nets, there are a few materials you’ll need to get started. First, you’ll need netting material like nylon or polyester, which can be found at most hardware stores or online retailers. You’ll also need PVC piping for the frame, typically around
5 inches in diameter. For the connectors, you can use PVC elbows and T-joints, which will help you to assemble the frame. Finally, you’ll need some zip ties or cord to attach the netting material to the frame.
With these materials, you can create a sturdy and reliable basketball barrier net that will keep the ball contained during games and practice sessions! Don’t forget to carefully measure and cut your materials to ensure a proper fit and secure assembly. Happy building!
Netting
When it comes to netting, you’ll need a few essential materials to get started. The first thing on your list should be the netting itself – you can choose from a variety of materials depending on your needs and preferences. Nylon is a popular choice due to its durability and strength, while cotton is more lightweight and breathable.
You’ll also need some type of frame, such as a hoop or wooden frame, to help shape the netting as you work. Other useful items include a needle and thread to help with any repairs, as well as a pair of scissors to trim the netting to the desired size and shape. With these materials in hand, you’ll be ready to start creating your own custom netting for a variety of different applications.
Whether you’re making fishing nets, bird netting, or something else entirely, having the right materials will help ensure success.
Rope/Cord
When it comes to crafting or DIY projects, rope or cord is a versatile material that can be used in all sorts of creative ways. To begin with, you’ll need to choose the type of rope or cord that suits your project best. There are a wide variety of materials available, including cotton, nylon, sisal, and jute.
Each material has different strengths and characteristics, so it’s important to select the right type for your needs. You may also need to consider the thickness or diameter of the rope, as well as its length. Once you have your rope or cord, you can start to get creative.
You might use it to create a macrame plant holder, embellish a piece of clothing or create a woven wall hanging. The possibilities are endless. Don’t be afraid to experiment and try new things, and remember, with a little bit of imagination, even the simplest rope or cord can become a work of art!
Metal Poles
When it comes to building metal pole structures, there are a few key materials that you’ll need to ensure your project is a success. First and foremost, you’ll need metal poles themselves. These can come in a variety of materials, such as aluminum or steel, and in different widths and thicknesses depending on your specific needs.
You’ll also likely need connectors or fittings to join the poles together, as well as a sturdy base to hold everything in place. Other materials you might need include tools for cutting and drilling the poles, as well as any additional components depending on the design of your pole structure. Overall, taking the time to gather all the necessary materials before starting your project will ensure that your metal pole structure is not only sturdy and reliable, but also meets your specific needs and vision.
Clamps/Carabiners
When it comes to building and repairing different kinds of equipment, clamps and carabiners are some of the most essential tools to have. Whether you’re working on outdoor gear or machinery, these devices are used to hold things together securely and are designed to withstand high levels of stress and pressure. Some of the materials you’ll need to make your own clamps and carabiners include high-quality steel, aluminum alloys, and titanium.
Steel is an excellent choice for heavy-duty projects, while aluminum alloys are ideal for lighter weight equipment. Titanium is an expensive option but offers superior strength and durability. Additionally, you’ll need to have high-quality tools, such as a lathe or milling machine, to ensure that your clamps and carabiners are accurately manufactured and meet the highest standards of quality and safety.
With the right materials and tools, you can create clamps and carabiners that are tailored to your specific needs and that will stand up to even the most challenging projects.
Step-by-Step Instructions
If you are looking to create your own DIY basketball barrier nets, follow these step-by-step instructions to get started. First, gather the necessary materials, including netting, rope, carabiners, and poles. Then, measure and cut the netting to the desired size, leaving enough excess to attach to the poles.
Next, tie the rope to the carabiners and secure them to the top corners of the net. Attach the other end of the rope to the poles, ensuring the net is taut. Repeat this process for the bottom corners of the net, ensuring there are no gaps.
Finally, test the net to make sure it can withstand the force of a basketball. This DIY project can be a fun and cost-effective way to create a personalized barrier net for your backyard basketball court or recreational area.
Measure and Cut Netting
When it comes to creating a netting system, one of the most important steps is measuring and cutting the netting to the appropriate size. This can be a bit of a tricky task, but with the right tools and techniques, it can be done quickly and easily. First, start by measuring the area where the netting will be installed.
Make sure to measure both length and width, and add a few inches to account for any curves or corners in the space. Once you have your measurements, it’s time to cut the netting. Use a sharp pair of scissors or a utility knife to carefully cut along the marked lines.
Be sure to take your time and cut slowly, as rough cuts can leave jagged edges and slow down the installation process. With a little patience and attention to detail, you can create a perfectly sized netting system to keep your space protected and secure.
Thread Rope/Cord Through Netting
If you’re looking to thread a rope or cord through netting, it’s important to follow some basic steps to make sure it’s done properly. First, choose a rope or cord that is thin enough to fit through the holes in your netting but strong enough to support whatever it is that you’re hanging. Cut a length of rope that’s several inches longer than your netting to give yourself enough slack to work with.
Next, attach a small metal hook to the end of your rope to make it easier to thread through the holes in the netting. Once you’ve threaded the rope through all of the holes in your netting, tie a knot at each end to secure it in place. If you’ll be hanging something heavy, like a hammock, make sure to test your knots to ensure they’re tight and secure before hanging anything from your new netting setup.
With these simple steps, you’ll be able to quickly and easily thread a rope or cord through netting and create a sturdy and reliable hanging system.
Attach Netting to Metal Poles
Attaching netting to metal poles can seem like a daunting task, but with these step-by-step instructions, you’ll be able to get the job done in no time. Firstly, ensure that you have all the necessary tools, including zip ties and metal clamps. Next, begin by placing the netting over the top of the pole, ensuring that it’s the correct size.
Then, proceed to attach the netting to the pole using either the zip ties or metal clamps, depending on your preference. It’s important to make sure that the netting is securely fastened to the pole to prevent any animals or debris from getting through. Repeat the process for each pole until all the netting is securely attached.
By following these simple steps, you can easily attach netting to metal poles, providing a safe and secure barrier for your property.
Secure with Clamps/Carabiners
When it comes to securing items with clamps or carabiners, there are a few key steps you’ll want to follow to ensure everything stays in place. First, make sure you have the right size and shape of clamp or carabiner for the job – you don’t want something too loose or too tight. Once you’ve chosen your tool, attach it securely to one end of your item, whether that’s a rope, cable, or other material.
From there, pass the other end of your item through the clamp or carabiner, making sure it’s snug but not too tight. Finally, close the clamp or carabiner securely, making sure it’s locked in place before you move on to the next step. With these simple tips, you can secure items with confidence and ease, knowing they’ll stay in place no matter what.
Tips and Tricks
If you’re a fan of basketball and have your own hoop at home, you might have experienced the frustration of constantly running after your missed shots. But fear not, because with a little effort and creativity, you can easily make your own DIY basketball barrier nets to prevent the ball from flying away. Firstly, determine the size of your netting and purchase the appropriate amount of nylon netting and eye bolts.
Then, attach the eye bolts to the poles or walls around your basketball hoop, and thread the netting through each one until it’s completely tied up. By doing this, you’ll be able to catch any stray shots while still being able to enjoy the game without interruptions. Not only will your DIY basketball barrier net provide a practical solution, but it also adds a layer of customization to your home court.
So, grab some materials and get to work on creating a convenient and personalized basketball net barrier that you’ll love.
Double-check Measurements
Double-check Measurements One of the most critical aspects of any DIY or home improvement project is accuracy. Whether you’re building a bookshelf or doing a full-room renovation, it’s essential to make sure your measurements are precise. Nothing can throw off a project faster than an inaccurate measurement.
That’s why double-checking your measurements is a crucial step in any project. It’s easy to make a mistake, even for experienced DIYers, so taking the extra time to review your measurements can save you a lot of headache and money. From measuring twice to using the right tools and techniques, there are plenty of tips and tricks to ensure your project gets off on the right foot.
Don’t forget to use a sturdy level and a straightedge for accuracy, and measure from multiple angles to be doubly sure. Always remember, taking the time to double-check your measurements will ultimately save you time, money, and frustration in the long run.
Use Strong Knots
One of the most important skills a fisherman needs to master is how to tie strong knots. It doesn’t matter how good your gear is or how experienced you are, if your knot isn’t strong, you’re likely to lose your catch. Fortunately, with a little practice, anyone can become an expert knot-tyer.
Here are some tips and tricks to help you get started. First, make sure you’re using the right knot for the job. Different types of knots are better for different situations, and using the wrong knot can weaken your line.
Second, practice your knots regularly until you can tie them quickly and confidently. And finally, always double-check your knots before you cast your line. By following these guidelines, you’ll be able to tie strong knots that will help you land more fish.
Test Tension before Use
When it comes to using equipment, safety should always be a top priority. One crucial safety tip that is often overlooked is checking the tension before use. This is especially important for equipment that uses ropes, bands, or cables.
Before starting your exercise routine or operation, make sure to check the tension of your equipment. This simple step will not only help prevent accidents, it will also ensure that you get the most out of your equipment. Always remember that checking the tension of your gear is just as important as any other safety measure you take.
So, make it a habit to test the tension regularly and keep yourself and others safe.
Maintain and Repair as Needed
When it comes to maintaining and repairing your belongings, there are a few important tips and tricks to keep in mind. Firstly, it’s important to regularly clean and inspect your items in order to catch any potential issues before they escalate. This could involve wiping down electronics, oiling hinges on doors and cabinets, or checking the tread on your tires.
Additionally, don’t be afraid to tackle small repairs yourself using online tutorials or the assistance of a handy friend. This can save you time and money in the long run, as well as increase your sense of self-sufficiency. However, it is important to know when a problem requires professional attention, such as electrical work or plumbing issues.
By taking care of your belongings with regular maintenance and targeted repairs, you can extend the life of your items and ultimately save money in the long run.
Conclusion
In conclusion, DIY basketball barrier nets are the ultimate solution for any basketball enthusiast looking to improve their game while also saving some money. With a little bit of effort and creativity, you can build a net that will not only keep your basketball in play but also provide a sense of satisfaction that comes with creating something with your own hands. So, get ready to enjoy endless hours on the court without worrying about chasing balls around the neighborhood.
With a DIY basketball barrier net, you’ll be the envy of your fellow players and the ultimate champ of your driveway. Game on!”
FAQs
What materials do I need to make a DIY basketball barrier net?
To make a DIY basketball barrier net, you will need netting material, rope or cable, clips or hooks, and your choice of support structure such as PVC pipes, metal poles, or trees.
How do I determine the size of my DIY basketball barrier net?
To determine the size of your DIY basketball barrier net, measure the length and width of the area you want to cover. Cut your netting material to a slightly larger size than your measurements to ensure proper coverage.
Is it safe to use a DIY basketball barrier net?
Yes, it is safe to use a DIY basketball barrier net as long as it is properly secured and regularly inspected for wear and tear. Make sure to follow all construction and safety guidelines when building and using your net.
Can I customize the color of my DIY basketball barrier net?
Yes, you can customize the color of your DIY basketball barrier net by selecting netting material in your desired color or by painting the netting material after construction. Just make sure to use a paint that is safe for use on the type of netting material you choose.