Are you a basketball enthusiast looking to practice your skills at home? One of the best ways to do this is by mounting a basketball hoop to your garage! It’s a great project that you can tackle on your own with a few simple tools and a bit of know-how. But where do you even begin? Don’t worry, we’ve got you covered with this step-by-step guide on how to mount a basketball hoop to your garage. With clear and detailed instructions, you’ll have your hoop up and ready to go in no time! So, grab your drill and let’s get started!
Materials Needed
If you’re wondering how to mount a basketball hoop to your garage, you’re in luck. With the right materials, it can be a relatively simple task to complete. Firstly, you’ll need a basketball hoop kit.
This will typically include all the hardware and brackets needed to install the hoop. You’ll also need a ladder, power drill, wrench, and a level to ensure that the hoop is straight. Additionally, you’ll want to have some concrete mix on hand to secure the brackets in place.
If your garage doesn’t have a suitable surface for the hoop, you may need to install a backboard, which will require a bit more work. Make sure you have all the necessary tools and equipment before you start, and don’t be afraid to ask for help if necessary. With a little bit of effort, you’ll be enjoying a game of basketball in no time!
List of Required Materials
When starting a new project, it’s essential to have all the necessary materials on hand. Depending on the project, the required materials may vary, but there are some essential items that are useful for almost any project. A good quality adhesive like glue, tape, or a staple gun is useful for securing items in place.
Scissors, a ruler, a pencil, and a cutting mat will help measure and cut materials accurately. A variety of colored papers and cardstocks, pens, and pencils can be used to add color and visual interest to your project. If you are working with fabrics, a rotary cutter, fabric scissors, and a self-healing mat will make cutting easier.
If you are working with electronics, you may need a soldering iron, wire cutters, and pliers. Finally, safety equipment like gloves, safety glasses, and a dust mask should always be on hand. By having all the necessary materials, you can ensure that your project is completed efficiently and effectively.
Preparing Your Garage
If you’re looking to add a basketball hoop to your home, mounting it to your garage is a great option. Before you get started, make sure your garage is ready for the installation. First, check that it has a sturdy and level surface.
You’ll also need to ensure that there is enough space for the backboard and that there are no obstructions in the way. Once you’ve measured and cleared the space, it’s time to mount the backboard. Make sure to follow the instructions carefully and use the necessary tools and hardware.
It’s also important to ensure that the backboard is securely attached to the garage, so check the bolts and tighten as needed. With these steps, you’ll be ready to start practicing your shots in no time! Remember that safety is key, so be sure to follow all instructions and take precautions when installing your basketball hoop.
Assessing Garage Structure
Preparing your garage for a thorough inspection requires a systematic approach to accurately assess garage structure. Start by clearing out clutter and removing any unnecessary items from your garage to enable a proper evaluation of available space. Check for signs of damage such as cracks on walls, leaks, and worn-out flooring.
Also ensure that the garage door is functioning properly and well-maintained. Inspect the wiring and lighting fixtures to ensure they are secured and in good condition. Hiring a professional to assess the garage structure can help to identify any potential hazards and unsafe zones.
By taking these steps, you can create a safer and more organized garage area for you and your family, and possibly even increase the value of your home.
Installing Mounting Bracket
If you’re looking to install a mounting bracket in your garage, the first step is to prepare the area. Before you begin, it’s important to clear out any clutter or debris to create a safe working environment. You’ll also want to check the surface where you plan to install the bracket to ensure it’s sturdy enough to hold the weight of your belongings.
Once the area is prepped, it’s time to install the bracket. Start by marking the location where the bracket will be mounted, and then use a level to ensure it’s straight. Once you’re satisfied with the positioning, use screws and anchors to attach the bracket securely to the wall.
The key here is to make sure the bracket is anchored into studs or a solid backing. Once your bracket is in place, you’re ready to start organizing and maximizing your garage space. By installing a mounting bracket, you’ll be able to hang tools, bikes, and other items, keeping them off the ground and within easy reach.
With some careful planning and a little effort, you can transform a cluttered garage into an organized and functional space.
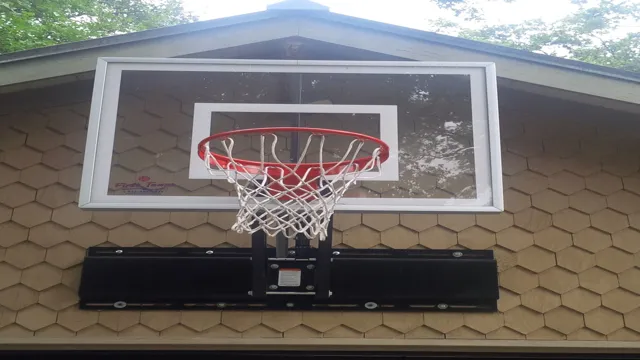
Attaching the Hoop
Now that you’ve got all your basketball hoop parts laid out and tools at the ready, it’s time to start mounting your hoop to the garage. The first step is to locate the areas on your garage where the hoop will be installed. Then, you need to attach the support brackets to the wall.
Make sure the brackets are perfectly aligned and square with each other, so the hoop can be mounted level. Once you’ve securely mounted the brackets onto the garage, it’s time to attach the actual basketball hoop to the brackets using bolts, washers, and nuts. Make sure to tighten the bolts and nuts until they are snug, but be careful not to over-tighten them.
This will help ensure that your hoop is stable and secure, so you don’t end up with a wobbly basketball backboard. With your hoop now attached and ready for use, get ready for endless hours of basketball fun!
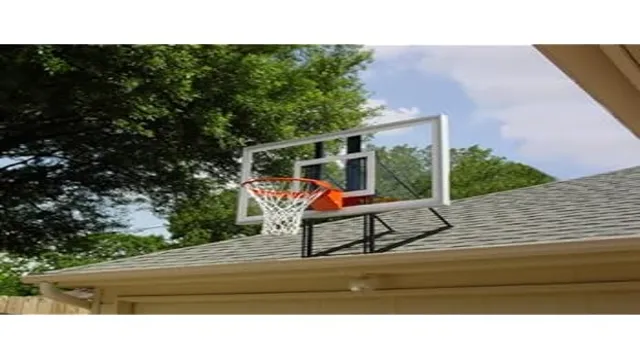
Positioning and Leveling the Hoop
When setting up your basketball hoop, one of the most important steps is positioning and leveling the hoop. This ensures that your hoop is secure and provides an optimal playing experience. It is essential to find a level surface to ensure the hoop is stable.
An unleveled surface can cause the hoop to tip over, resulting in damage or injury. Once you have determined the appropriate level surface, you can begin attaching the hoop assembly to the backboard. Firstly, attach the backboard to the mounting bracket, ensuring it is centered and level.
Secondly, attach the rim to the backboard by inserting the mounting bolts through the rim and into the backboard. Finally, adding a net to the hoop is optional, but it can enhance the playing experience by catching any stray shots. With these simple steps, you can position and level your basketball hoop, ensuring it provides a stable and enjoyable playing experience for years to come.
Securing the Hoop to the Mounting Bracket
When it comes to attaching the hoop to the mounting bracket, there are a few important things to keep in mind to ensure proper installation. Firstly, make sure that the mounting bracket is securely fastened to the surface where it will be placed. Once you have confirmed this, it’s time to attach the hoop.
Begin by sliding the hoop into the mounting bracket and aligning it with the desired angle. Then, use a wrench to tighten the bolts on either side of the bracket to secure the hoop in place. Make sure to check for any wobbling or looseness before attempting to use the hoop.
Properly securing the hoop to the mounting bracket is crucial for the safety of those using the basketball system. By taking the time to carefully attach the hoop, you can ensure that it will withstand use over time and that everyone using it will be able to enjoy the game without any worry.
Testing and Maintenance
When it comes to mounting a basketball hoop to your garage, safety should be your top priority. Before you start drilling holes, make sure to locate the studs to ensure that the hoop is securely fastened. Using a stud finder can make this task much easier.
Once you’ve found the studs, mark the location of the holes where the mounting bracket will go. It’s important to use the right hardware and to follow the manufacturer’s instructions carefully throughout the installation process. Once the hoop is up, periodic maintenance is important to ensure that it remains safe and functional.
Check the bolts and screws regularly to make sure they are tightened and secure. Give the backboard and rim a good cleaning from time to time and inspect the net for any signs of wear and tear. Following these steps will help you enjoy your new basketball hoop safely for years to come.
Ensuring Stability and Durability
Testing and maintenance are crucial components in ensuring the stability and durability of any software system. These processes are necessary to detect and fix errors and bugs, ensuring the smooth and efficient functioning of the program. Quality testing helps to identify issues and improves the performance of the system, while maintenance involves updates and upgrades that keep the program up to date with the ever-changing technological landscape.
Regular maintenance prevents the system from becoming outdated and helps to ensure its longevity. Without proper testing and maintenance, software systems can quickly become unstable, unreliable, and susceptible to crashes. Therefore, it is crucial to prioritize testing and maintenance to guarantee the reliability of any software system.
General Maintenance Tips
When it comes to ensuring your equipment is working optimally, regular testing and maintenance are crucial. Testing allows you to identify any underlying issues that may not be immediately apparent, while maintenance helps prevent further damage or deterioration. Some general maintenance tips include keeping equipment clean and well-lubricated, checking for wear and tear regularly, and replacing any damaged parts as soon as possible.
In addition, scheduling routine inspections and servicing can help catch minor issues before they turn into costly repairs or replacements. Remember, neglecting maintenance can lead to damaged equipment or even safety hazards, so it’s important to stay on top of it to ensure everything runs smoothly. Keyword: maintenance
Conclusion
In conclusion, mounting a basketball hoop to your garage is a slam dunk when you follow these easy steps. With a little bit of patience and some basic tools, you’ll be shooting hoops in no time. And with this new addition to your home court, your friends and family will surely be impressed by your ballin’ skills.
So go ahead, take that shot, and enjoy the satisfaction of a job well done. Remember, with a little bit of effort and know-how, you can make any goal a reality – even if it’s just putting up a hoop. Game on!”
FAQs
What tools do I need to mount a basketball hoop to my garage?
You will need a drill, drill bits, screws, a level, a tape measure, and a wrench.
Can I mount a basketball hoop to a brick garage?
Yes, you can mount a basketball hoop to a brick garage using a masonry bit and screws designed for use in brick.
How high should a basketball hoop be mounted on a garage?
A standard basketball hoop should be mounted 10 feet high on a garage.
Can I mount a basketball hoop to a metal garage door?
It is not recommended to mount a basketball hoop directly onto a metal garage door as it may damage the door. Instead, consider mounting a backboard onto the garage and then attaching the hoop to the backboard.
Do I need to anchor the basketball hoop to the ground?
It depends on the type of basketball hoop and the manufacturer’s instructions. Some hoops may require anchoring to the ground for stability and safety. Always refer to the manufacturer’s instructions for proper installation.